
In this step-by-step tutorial, we will learn how to set up Firebase Authentication in a Next.js application. Firebase Authentication provides backend services, easy-to-use SDKs, and ready-made UI libraries to authenticate users to your app. Combining it with the power of Next.js, you can easily manage user authentication with very little setup.
Before we begin, make sure you have the following:
- Node.js and npm installed
- Basic knowledge of Next.js
- A Firebase project set up
You can set up a Firebase project by visiting the Firebase Console.
Setting Up the Next.js Project
First, initialize a new Next.js project and install the necessary dependencies. Open your terminal and run the following commands:
npx create-next-app@latest my-app
cd my-app
npm install firebase
Note: You can use TypeScript if you want but in this tutorial we are not using TypeScript.
Configuring Firebase in Next.js
Next, create a Firebase config file and initialize Firebase in your project. You can find your Firebase project's configuration in the Firebase Console under Project Settings.
Note: You will need to go into your Firebase console and create a Firebase project and then register your app with Firebase. After registering get the Firebase SDK snippet and you will need to move that to your .env file.
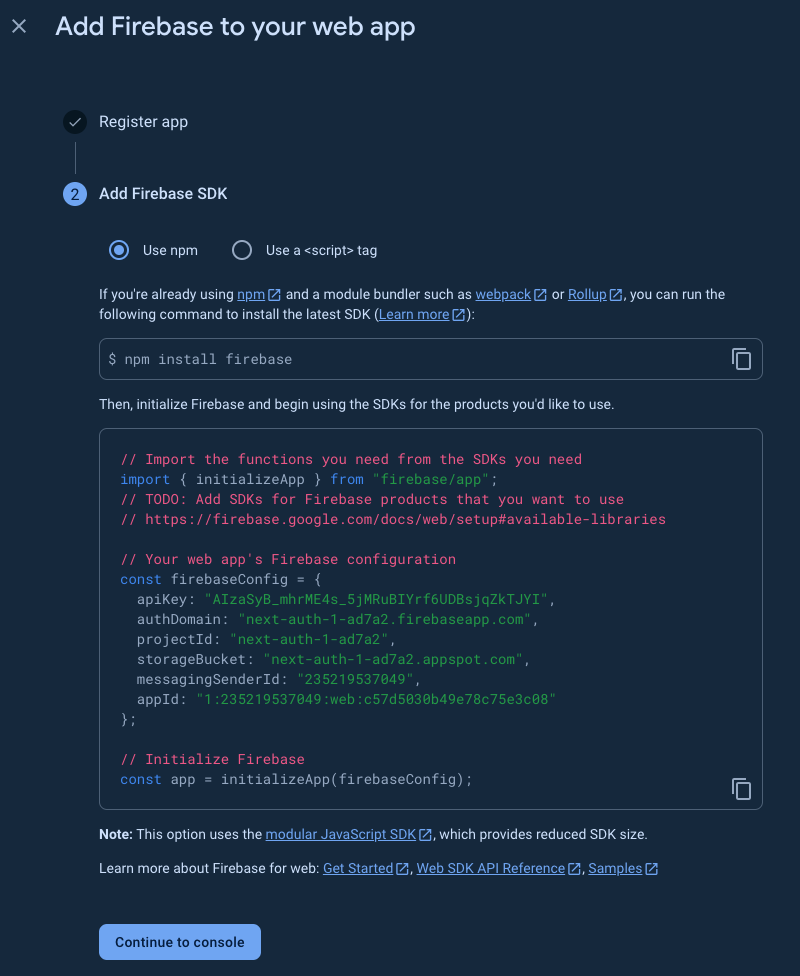
Create a file named firebase.js in the root of your project and add the following code:
import { initializeApp } from 'firebase/app';
import { getAuth } from 'firebase/auth';

const firebaseConfig = {
  apiKey: process.env.NEXT_PUBLIC_FIREBASE_API_KEY,
  authDomain: process.env.NEXT_PUBLIC_FIREBASE_AUTH_DOMAIN,
  projectId: process.env.NEXT_PUBLIC_FIREBASE_PROJECT_ID,
  storageBucket: process.env.NEXT_PUBLIC_FIREBASE_STORAGE_BUCKET,
  messagingSenderId: process.env.NEXT_PUBLIC_FIREBASE_MESSAGING_SENDER_ID,
  appId: process.env.NEXT_PUBLIC_FIREBASE_APP_ID
};

const app = initializeApp(firebaseConfig);
export const auth = getAuth(app);
For more details, refer to the Firebase SDK documentation.
Setting Up Authentication in Firebase
Enable authentication methods in the Firebase Console. Go to the Authentication section, then click on the Sign-in method tab, and enable the desired authentication providers (e.g., Email/Password, Google, etc.).
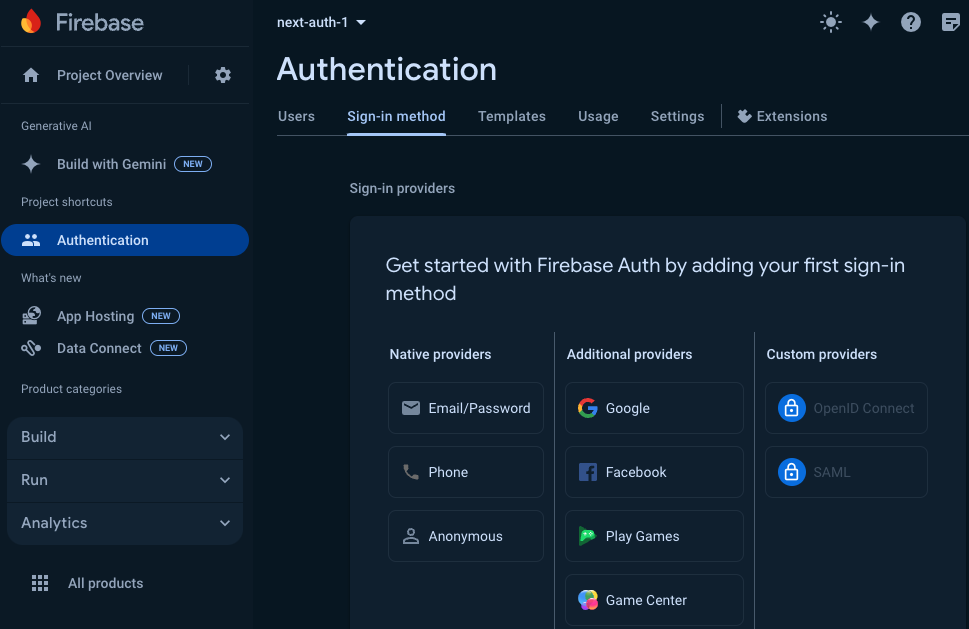
For more information, visit the Firebase Authentication documentation.
Creating Authentication Context in Next.js
To manage the authentication state in your Next.js application, create a context. Create a file named AuthContext.js and add the following code:
// /
"use client"

import { createContext, useContext, useEffect, useState } from "react"
import { onAuthStateChanged } from "firebase/auth"
import { auth } from "./firebase"

const AuthContext = createContext()

export const AuthProvider = ({ children }) => {
  const [user, setUser] = useState(null)
  const [loading, setLoading] = useState(true)

  useEffect(() => {
    const unsubscribe = onAuthStateChanged(auth, (user) => {
      setUser(user)
      setLoading(false)
    })
    return () => unsubscribe()
  }, [])

  return (
    <AuthContext.Provider value={{ user, loading }}>
      {children}
    </AuthContext.Provider>
  )
}

export const useAuth = () => useContext(AuthContext)
Then wrap your /src/app/layout.js application with the AuthProvider:
// /src/app/layout.js
import { Inter } from "next/font/google"
import { AuthProvider } from "../../AuthContext"
import "./globals.css"

const inter = Inter({ subsets: ["latin"] })

export const metadata = {
  title: "Create Next App",
  description: "Generated by create next app",
}

export default function RootLayout({ children }) {
  return (
    <html lang="en">
      <body className={inter.className}>
        <AuthProvider>{children}</AuthProvider>
      </body>
    </html>
  )
}
Implementing Sign-Up and Login Functionality
Create sign-up and login components to handle user authentication in a new /src/components folder. Here is an example of a Signup component:
// /src/components/Signup.js
import { useState } from "react"
import { createUserWithEmailAndPassword } from "firebase/auth"
import { auth } from "../../firebase"
import { useRouter } from "next/navigation"

const SignUp = () => {
  const [email, setEmail] = useState("")
  const [password, setPassword] = useState("")
  const [signUpError, setSignUpError] = useState(null)
  const router = useRouter()

  const handleSignUp = async (e) => {
    e.preventDefault()
    try {
      await createUserWithEmailAndPassword(auth, email, password)
      router.push("/") // Navigate to the home page
    } catch (error) {
      console.error("Error signing up:", error)
      setSignUpError(error.message)
    }
  }

  return (
    <form
      onSubmit={handleSignUp}
      className="flex flex-col p-8 gap-4 text-black min-w-80"
    >
      <input
        type="email"
        value={email}
        onChange={(e) => setEmail(e.target.value)}
        placeholder="Email"
        className="p-2 rounded-sm"
      />
      <input
        type="password"
        value={password}
        onChange={(e) => setPassword(e.target.value)}
        placeholder="Password"
        className="p-2 rounded-sm"
      />
      <button
        type="submit"
        className="p-2 rounded-sm bg-green-500 font-semibold text-lg text-white"
      >
        Sign Up
      </button>
      {signUpError && (
        <p className="text-red-500 text-sm">{signUpError.message}</p>
      )}
    </form>
  )
}

export default SignUp
Then create the Login component:
// /src/components/Login.js
import { useState } from "react"
import { signInWithEmailAndPassword } from "firebase/auth"
import { auth } from "../../firebase"
import { useRouter } from "next/navigation"

const Login = () => {
  const [email, setEmail] = useState("")
  const [password, setPassword] = useState("")
  const [loginError, setloginError] = useState(null)
  const router = useRouter()

  const handleLogin = async (e) => {
    e.preventDefault()
    try {
      await signInWithEmailAndPassword(auth, email, password)
      router.push("/") // Navigate to the home page
    } catch (error) {
      console.error("Error logging in:", error)
      setloginError(error.message)
    }
  }

  return (
    <form
      onSubmit={handleLogin}
      className="flex flex-col p-8 gap-4 text-black min-w-80"
    >
      <input
        type="email"
        value={email}
        onChange={(e) => setEmail(e.target.value)}
        placeholder="Email"
        className="p-2 rounded-sm"
      />
      <input
        type="password"
        value={password}
        onChange={(e) => setPassword(e.target.value)}
        placeholder="Password"
        className="p-2 rounded-sm"
      />
      <button
        type="submit"
        className="p-2 rounded-sm bg-green-500 font-semibold text-lg text-white"
      >
        Login
      </button>
      {loginError && (
        <p className="text-red-500 text-sm">{loginError.message}</p>
      )}
    </form>
  )
}

export default Login
Creating /signup and /login routes
Signup page:
// /src/app/signup/page.js
"use client"
import SignUp from "@/components/Signup"

const SignUpPage = () => {
  return (
    <div className="flex min-h-screen flex-col items-center p-24">
      <h1 className="text-4xl">Sign Up</h1>
      <SignUp />
    </div>
  )
}

export default SignUpPage
Login page:

// /src/app/login/page.js
"use client"
import Login from "@/components/Login"

const LoginPage = () => {
  return (
    <div className="flex min-h-screen flex-col items-center p-24">
      <h1 className="text-4xl">Login</h1>
      <Login />
    </div>
  )
}

export default LoginPage
Protecting Routes
To protect routes in your application, create a higher-order component (HOC). Here’s an example:
// /src/utils/withAuth.js
import { useAuth } from "../../AuthContext"
import { useRouter } from "next/navigation"
import { useEffect } from "react"

const withAuth = (WrappedComponent) => {
  const ComponentWithAuth = (props) => {
    const { user } = useAuth()
    const router = useRouter()

    useEffect(() => {
      if (!user) {
        router.replace("/")
      }
    }, [user, router])

    if (!user) {
      return null // or a loading spinner
    }

    return <WrappedComponent {...props} />
  }

  ComponentWithAuth.displayName = `withAuth(${
    WrappedComponent.displayName || WrappedComponent.name || "Component"
  })`

  return ComponentWithAuth
}

export default withAuth
Then using the HOC function from above we can create a protected page like below:
// /src/app/protected/page.js
"use client"
import withAuth from "@/utils/withAuth"

const ProtectedPage = () => {
  return (
    <div className="flex min-h-screen flex-col items-center p-24 gap-4">
      <h1 className="text-4xl">Protected Page</h1>
      <p>Only logged in users can see this page.</p>
    </div>
  )
}

export default withAuth(ProtectedPage)
Note: The above creates a /protected route that will only be visible if the user is logged in.
For more details, check out the Next.js Routing documentation.
Adding a Logout Function
Implement the logout functionality in your application. Update your authentication context and create a Logout button:
// /src/components/Signout.js
import { useAuth } from "../../AuthContext"
import { signOut } from "firebase/auth"
import { auth } from "../../firebase"

const SignOut = () => {
  const { user } = useAuth()

  const handleSignOut = async () => {
    try {
      await signOut(auth)
      console.log("User signed out")
    } catch (error) {
      console.error("Error signing out:", error)
    }
  }

  if (!user) {
    return null // Don't display the sign out button if the user is not logged in
  }

  return (
    <button
      onClick={handleSignOut}
      className="p-2 rounded-sm bg-red-500 font-semibold text-white"
    >
      Sign Out
    </button>
  )
}

export default SignOut
Note: Firebase Auth has a signout method so I'm calling the component SignOut but you can name it whatever you like.
Creating The Updated Homepage

// /src/app/page.js
"use client"

import Link from "next/link"
import { useAuth } from "../../AuthContext"
import SignOut from "@/components/Signout"

export default function MyApp() {
  const { user, loading } = useAuth()

  return (
    <main className="flex min-h-screen flex-col items-center justify-between p-24">
      <div className="flex flex-col z-10 max-w-5xl w-full items-center justify-between font-mono text-sm lg:flex">
        <h1 className="text-4xl">NextJS Authentication App</h1>
        <div className="flex flex-col gap-4 justify-center items-center mt-8">
          {user ? (
            <>
              <p className="text-xl">Welcome, {user.email}!</p>
              <Link
                href="/protected"
                className="text-blue-500 underline text-lg"
              >
                <p>Visit the protected page</p>
              </Link>
              <SignOut />
            </>
          ) : (
            <>
              <p className="text-xl">You are not signed in.</p>
              <Link href="/login">
                <button className="p-2 rounded-sm bg-blue-500 text-lg font-semibold text-white w-48">
                  Login here
                </button>
              </Link>
              <Link href="/signup">
                <button className="p-2 rounded-sm bg-blue-500 text-lg font-semibold text-white w-48">
                  Signup here
                </button>
              </Link>
            </>
          )}
        </div>
      </div>
    </main>
  )
}
Testing the Auth Functionality
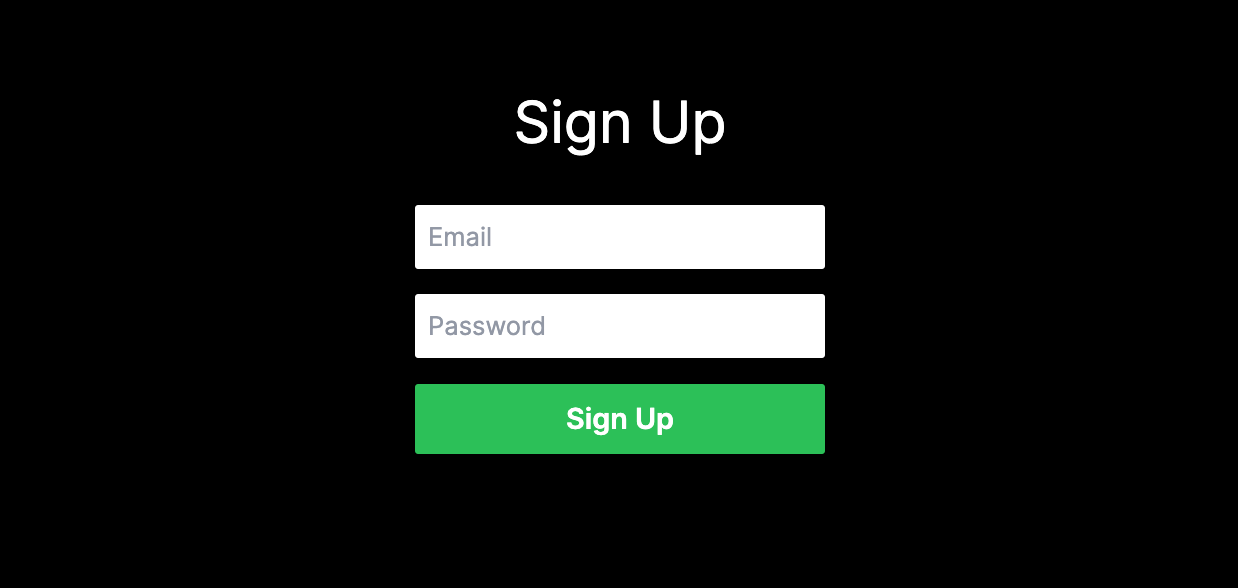
Starting from the homepage initially without any users you will see a Login and a Signup button.
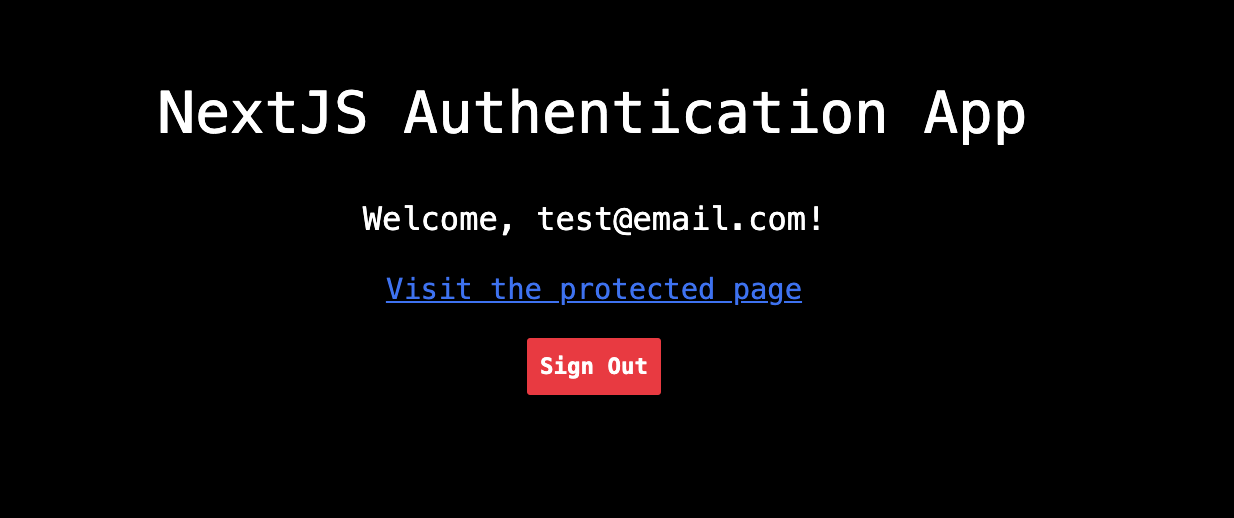
From here click Signup here and create a new user using any email and password as such.

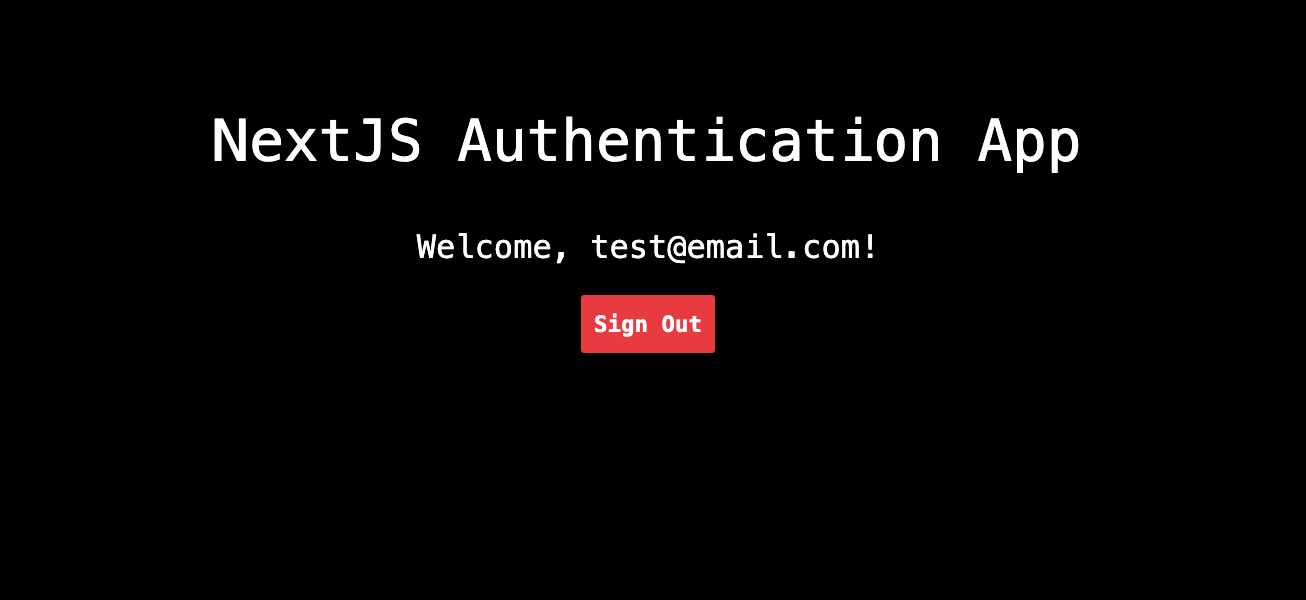
After signing up you will get taken to the homepage and see something like this with the email you signed up with.
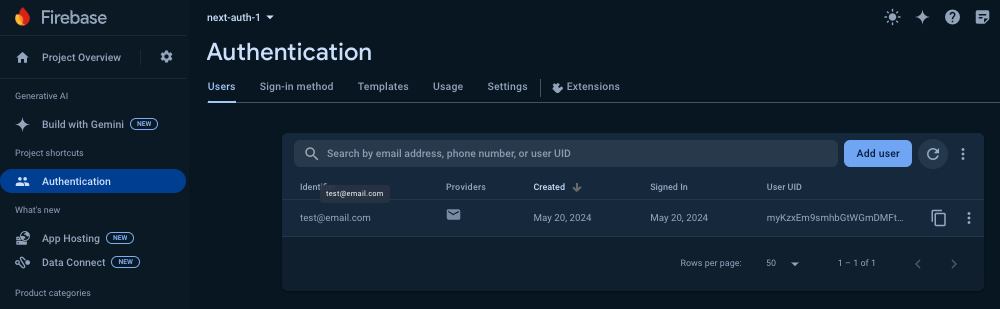
You can also confirm the user is created in Firebase by visiting the console > Authentication > Users.
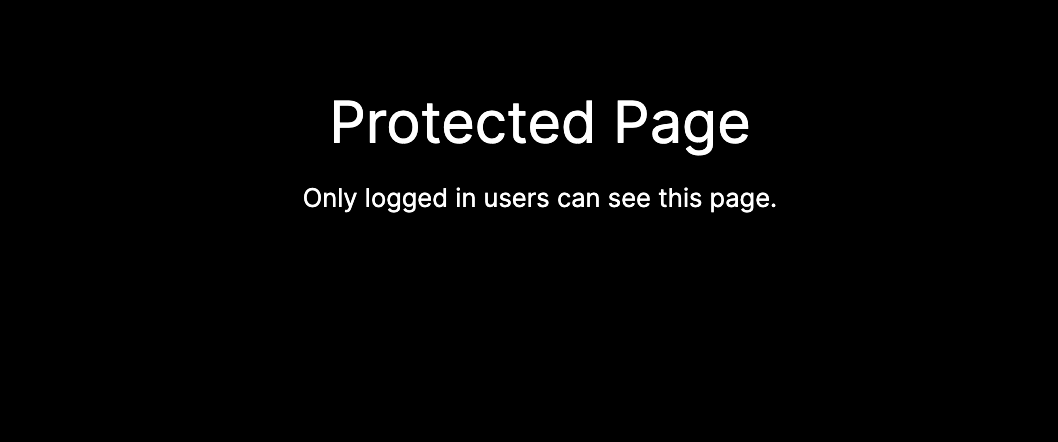
After confirming you can now visit the /protected route from the homepage link.
Click Visit the protected page
Now you can try Logging out and Logging back in but more importantly after Logging out try to visit /protected and get redirected to the / page.
Conclusion
You've learned how to successfully use Firebase Authentication in NextJS 14. This is a great to Firebase Authentication.
To review in this article, we learned:
- How to set up Firebase Authentication with Next.js 14
- Creating a Next.js project
- Configuring Firebase
- Implementing Signup, Login and Logout functionality
- Creating protected routes
- Redirecting unauthorized users to homepage
After going through this step by step article you now can easily manage user authentication in your current and future Next.js apps with Firebase Authentication.
Next I recommend you learn about setting up Firebase Firestore.
For more information and advanced features, explore the Firebase documentation and the Next.js documentation.
Showcasing Your Projects With A Portfolio Website
After you've completed a few projects and are ready to show it to the world, make sure you have a portfolio website to share with others.
The easiest way to do this is by signing up at MyDevPage and claiming your free portfolio website. Best part is, it only takes a few minutes and you don't have to write a single line of code! Try it today.